
Drawing a horse can feel overwhelming for beginners. Horses have complex shapes, graceful lines, and subtle muscle details. Yet, learning to sketch a horse step by step is not only possible—it’s a fun way to improve your artistic skills. This guide will walk you through the process, from basic shapes to the final details, using clear language, practical advice, and visual comparisons.
Whether you are new to drawing or have some experience, you’ll find useful tips and techniques to create a realistic horse sketch.
Understanding Horse Anatomy For Sketching
Before you start sketching, it helps to know the basic anatomy of a horse. Horses are large animals with strong muscles and unique proportions. If you understand their body structure, your sketches will look more accurate.
The main parts to focus on are:
- Head: Long and narrow, with a strong jaw.
- Neck: Arched, muscular, and connects smoothly to the shoulders.
- Body: Barrel-shaped, with a deep chest.
- Legs: Thin but powerful, with distinct joints.
- Tail: Flows naturally, often held low or high depending on the horse’s mood.
Horses have a clear bone structure and visible muscles, especially in the neck, shoulders, and legs. Beginners often miss the subtle curves and the way muscles create shadows. Study photos and real horses to see how light falls on their bodies.
Key Proportions
To sketch a horse accurately, keep these proportions in mind:
- The length of the horse’s body (from chest to rear) is about two times the length of the head.
- The height from the ground to the withers (top of the shoulders) is slightly less than the body’s length.
- The legs are about the same length as the body, but thinner.
Here’s a comparison of horse proportions to help you visualize:
| Body Part | Approximate Ratio | Common Beginner Mistake |
|---|---|---|
| Head | 1 unit | Too short or too round |
| Neck | 1 unit | Too straight or stiff |
| Body | 2 units | Too small for legs |
| Legs | 1.5–2 units | Too thick or short |
If you keep these ratios in mind as you draw, your horse will look much more natural.
Materials You Need For Horse Sketching
You don’t need expensive tools to sketch a horse. Here’s what you should have:
- Pencils: Use HB for light lines and 2B or 4B for darker shading.
- Paper: Smooth sketch paper works best for pencil drawings.
- Eraser: A soft eraser lets you clean up mistakes without damaging the paper.
- Sharpener: Keep your pencils sharp for fine details.
Some artists use kneaded erasers to lighten areas for highlights. A ruler can help with proportions, but it’s optional. Avoid colored pencils for your first sketch; stick with graphite to focus on shape and shading.
Step By Step Guide: Sketching A Horse
Now, let’s break down the process into clear steps. Each step builds on the previous one, so take your time and don’t rush.
Step 1: Drawing Basic Shapes
Start by sketching simple shapes to outline the horse’s body.
- Draw a large oval for the horse’s body.
- Add a smaller circle for the chest, connecting it to the body oval.
- Draw another circle for the rear (haunches).
- For the head, sketch a small oval, slightly pointed at one end.
- Connect the head to the body with a curved line for the neck.
These shapes help you place the horse’s features correctly. Don’t press hard; use light lines so you can erase or adjust later.
Step 2: Marking The Legs And Tail
- Draw four lines from the body oval to mark the legs. These should be slightly angled, not perfectly straight.
- Add small circles at the joints (knees, hocks, fetlocks).
- Sketch a line for the tail, curving gently from the rear circle.
This step helps you plan the horse’s posture. If the horse is walking, bend the legs slightly. If it’s standing still, keep the lines vertical.
Step 3: Refining The Outline
Now, use the basic shapes to draw the real outline of the horse.
- Start with the head, adding the jawline and muzzle.
- Draw the neck, making sure it curves smoothly and connects to the body.
- Outline the chest, belly, and rear with gentle curves.
- Shape the legs, adding the joints and hooves at the ends.
- Draw the tail, making it fuller and more natural.
Erase the original shapes as you go. Focus on creating smooth lines, not jagged edges.
Step 4: Adding Details
It’s time to add features and refine your sketch.
- Draw the eyes, nostrils, and mouth on the head. Horses have large, expressive eyes set high on the head.
- Add the ears, which are pointed and sit on top of the head.
- Sketch the mane along the neck. The mane can be long or short, depending on the horse.
- Draw muscle lines on the neck, legs, and shoulders. These should be subtle, not too dark.
- Add details to the hooves, showing the shape and the line where the hoof meets the leg.
Don’t overdo the details; keep them light and natural.
Step 5: Shading And Texture
Shading gives your horse sketch depth and realism.
- Use a softer pencil (2B or 4B) for darker areas.
- Shade under the belly, between the legs, and along the neck.
- Add light shading to the face, especially around the jaw and eyes.
- Use your finger or a blending stump to smooth the shading.
For texture, lightly sketch lines to show the mane and tail. Horses have a smooth coat, so avoid rough shading. If you want to show the horse’s muscles, use gentle curves and blend the lines.
Step 6: Final Touches
Review your sketch and make final adjustments.
- Clean up stray lines with an eraser.
- Add any extra details, like veins, wrinkles, or highlights.
- Make sure the legs are the same length and the hooves are even.
If you want, sign your drawing in the corner. Now you have a complete horse sketch!
Common Beginner Mistakes (and How To Fix Them)
Many new artists struggle with horse sketches. Here are some mistakes to watch for—and how to fix them.
- Stiff necks: Horses have flexible, curved necks. If your neck looks straight, redraw it with a gentle curve.
- Short legs: Horses’ legs are long and thin. Measure carefully and use reference photos.
- Flat bodies: The horse’s body should be rounded, not flat. Use ovals and curves to shape it.
- Misplaced joints: Knees and hocks should be in the right spots. Mark them with circles before drawing the legs.
- Tiny hooves: Hooves are big enough to support the horse’s weight. Draw them slightly larger.
- Over-shading: Horses have smooth skin. Use light shading and blend gently.
If you make a mistake, erase and try again. Even experienced artists redraw parts many times.
How To Use Reference Images
Reference images are very helpful, especially for beginners. They show you real horse proportions, poses, and muscle details. Use photos from books, websites, or your own pictures.
When using a reference:
- Compare your sketch to the photo often.
- Notice how the horse’s legs bend and how the head connects to the neck.
- Pay attention to shadows and highlights.
You can also trace over a photo to practice proportions, but always try to sketch freehand afterward. This builds your skills.
Comparing Horse Sketches: Beginner Vs Advanced
Let’s see how a beginner’s horse sketch compares to an advanced one.
| Feature | Beginner Sketch | Advanced Sketch |
|---|---|---|
| Proportions | Often inaccurate | More precise |
| Details | Minimal, basic shapes | Includes muscles, veins, fur |
| Shading | Flat, little depth | Realistic, shows light and shadow |
| Expression | Generic | Shows mood and personality |
Advanced sketches look more lifelike because the artist pays attention to anatomy, shading, and small features. With practice, your sketches will improve too.
Practical Tips For Better Horse Sketches
Drawing horses is challenging, but these practical tips can help you improve faster:
- Draw from life: If possible, sketch real horses at a stable or farm. You’ll see how they move and stand.
- Start with simple poses: Draw horses standing still before trying running or jumping poses.
- Use a grid: Lightly draw a grid over your paper to help place features. This keeps proportions accurate.
- Practice legs separately: Legs are tricky. Draw just the legs several times to master their shape.
- Break down complex poses: If a horse is rearing or galloping, sketch each part separately before combining them.
- Watch video tutorials: Seeing an artist draw step by step helps you understand the process. Try channels like DrawingWiffWaffles or Circle Line Art School.
One insight many beginners miss: Horses’ heads are not just ovals. The muzzle is longer, and the jaw is stronger than it looks in cartoons. Focus on these details for a more realistic sketch.
Exploring Different Horse Breeds
Horses come in many breeds, each with unique features. If you want to sketch different types, study their shapes.
For example:
- Arabian horses have small heads, arched necks, and high tails.
- Draft horses (like Clydesdales) are larger, with thick legs and broad chests.
- Ponies are shorter with rounder bodies.
Here’s a quick comparison:
| Breed | Distinct Feature | Sketching Challenge |
|---|---|---|
| Arabian | Curved neck, short back | Capturing elegance |
| Draft | Heavy muscles, feathered legs | Showing strength |
| Pony | Small, round shape | Keeping proportions |
Try sketching different breeds to expand your skills. Each one requires special attention to shape and detail.
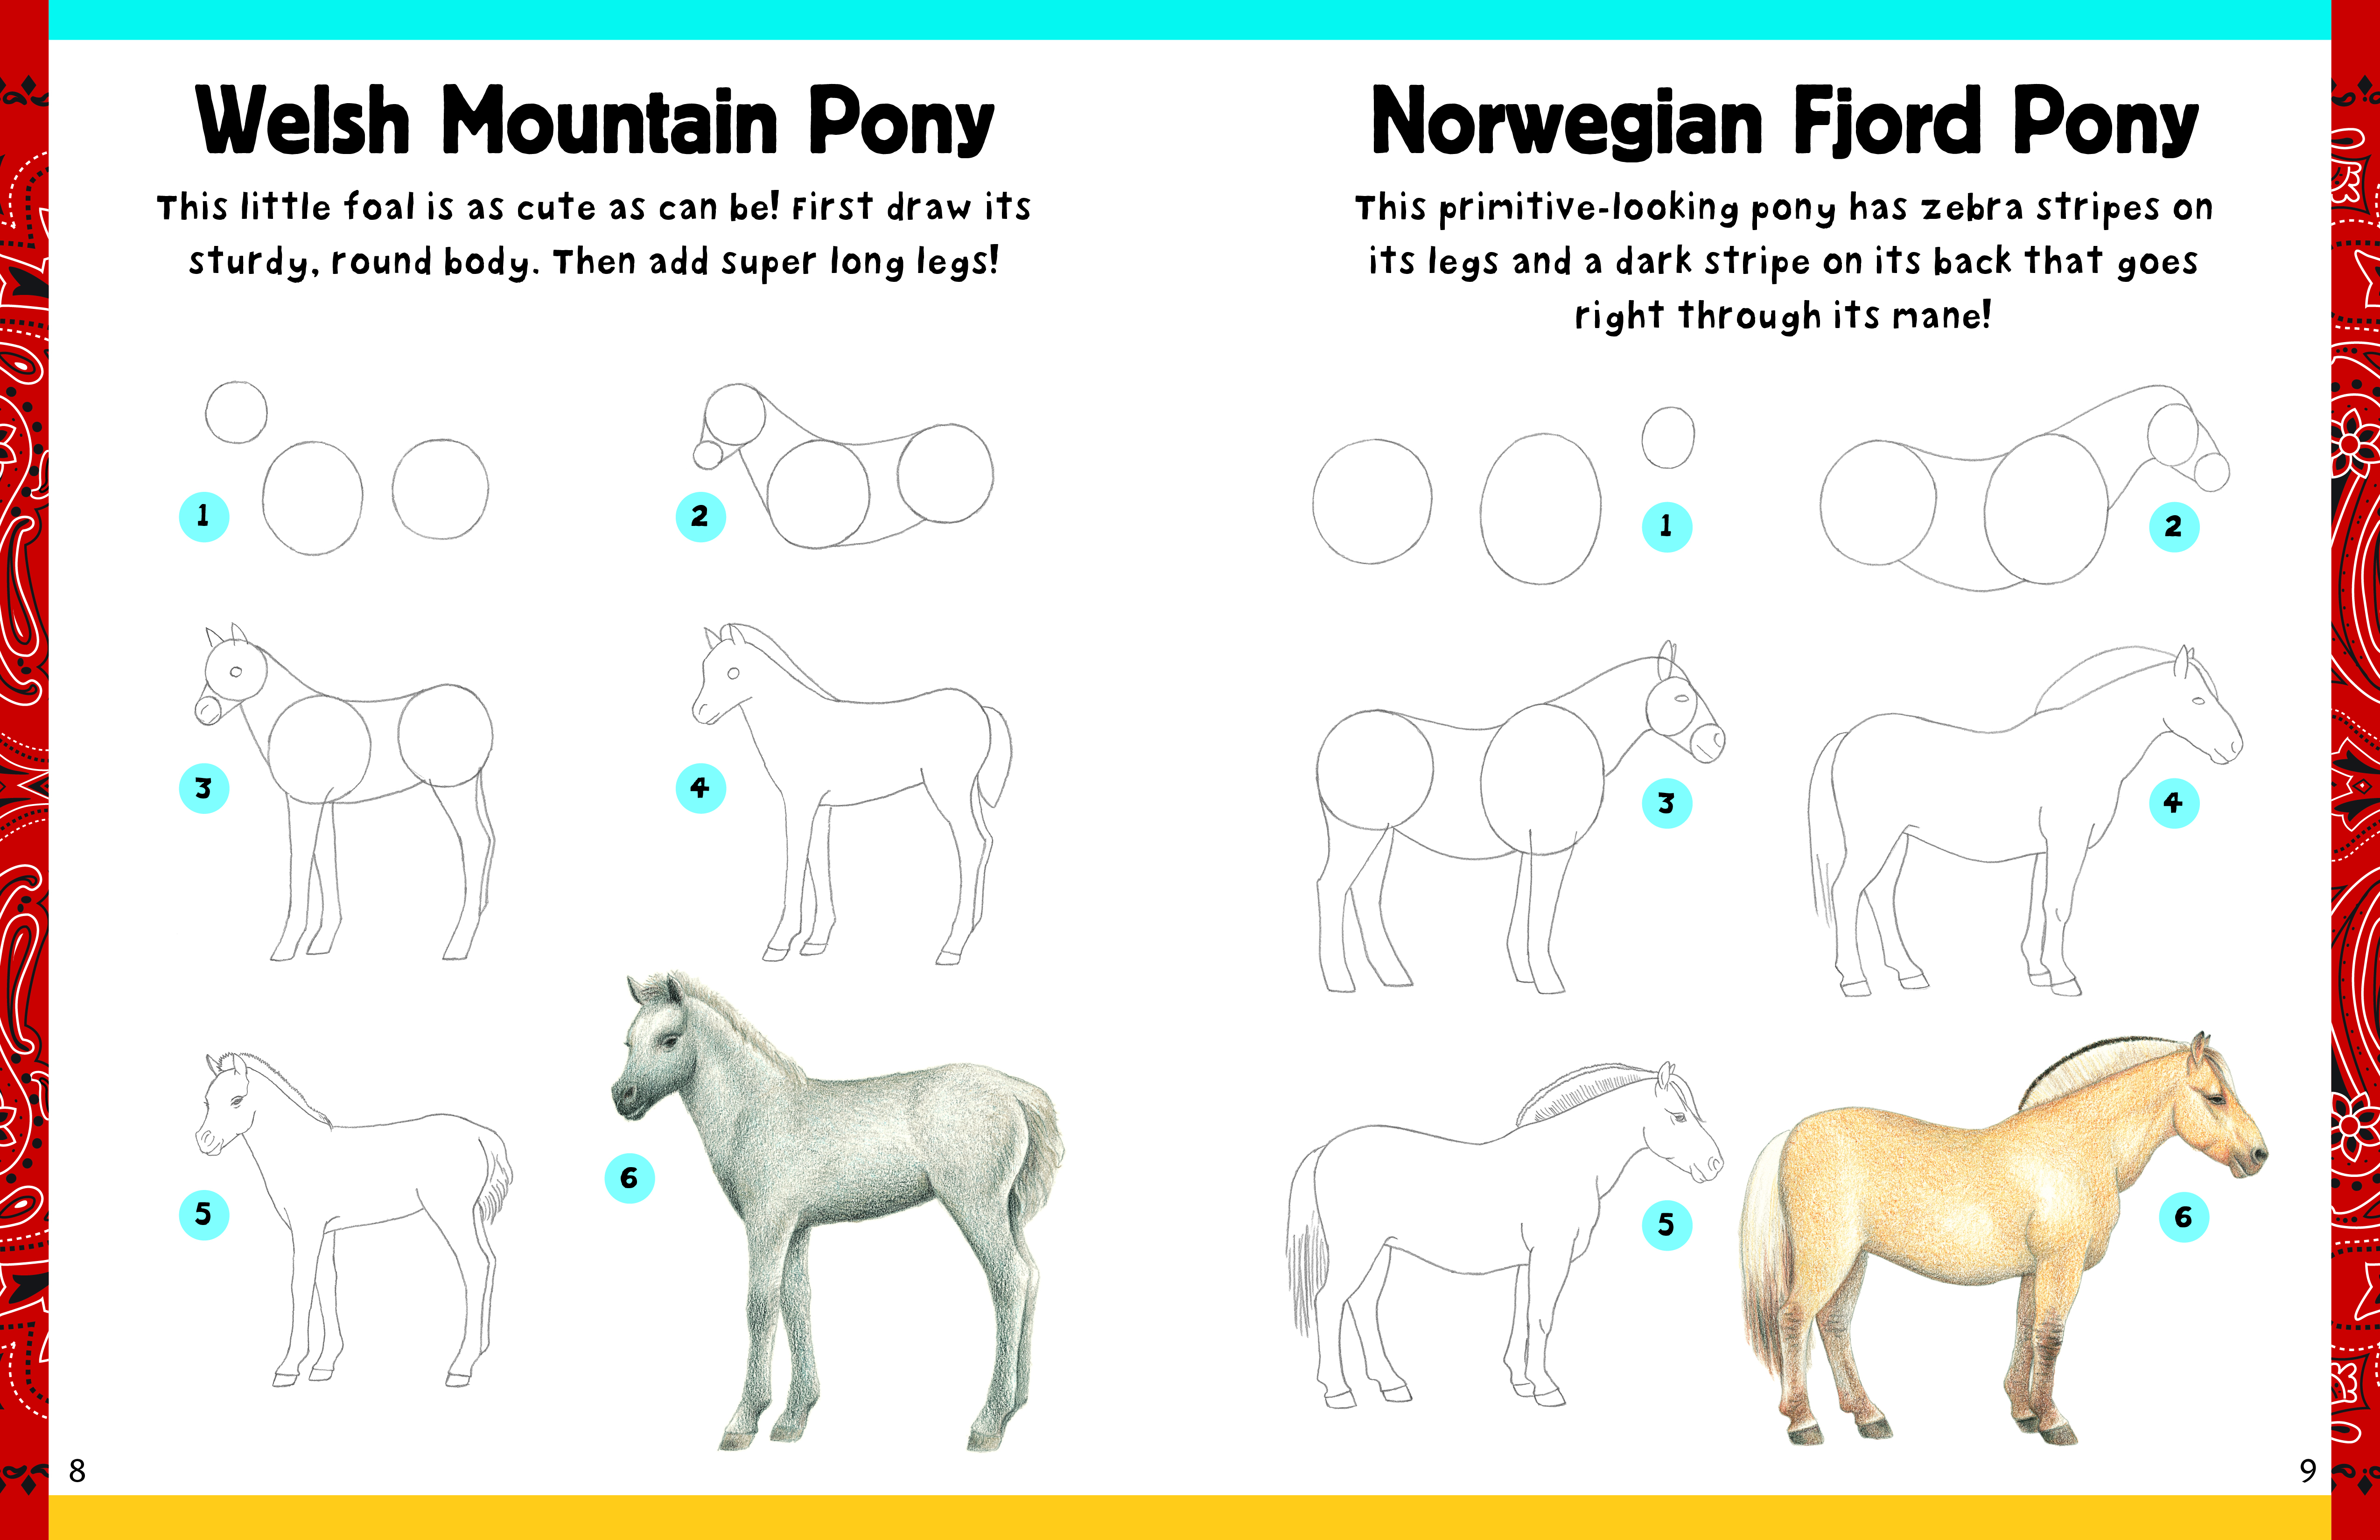
Credit: www.quarto.com
Adding Backgrounds And Context
A horse sketch looks more complete with a simple background. You don’t need to draw a full landscape; a few lines can suggest ground or environment.
Ideas for easy backgrounds:
- Draw grass or dirt under the horse’s hooves.
- Sketch a fence or stable wall behind.
- Add a tree or bush to show scale.
Backgrounds also help set the mood. If the horse is galloping, add motion lines or dust clouds. For a calm pose, use soft shading.
Turning Your Sketch Into Art
Once you finish your horse sketch, you can turn it into a finished artwork.
- Outline with ink: Go over your lines with a fine pen for a clean look.
- Add color: Use colored pencils or watercolor to paint the horse and background.
- Frame your drawing: Mount it on a mat or frame for display.
If you want to share your art online, scan or photograph your sketch. Adjust the brightness and contrast for clarity.
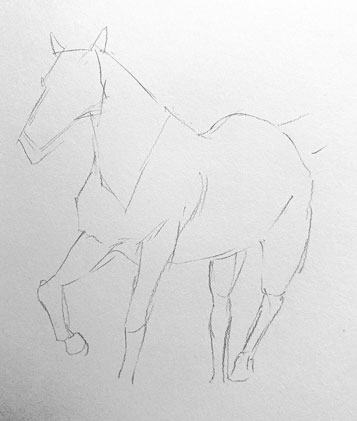
Credit: barnettgallery.com
Horse Sketching For Different Skill Levels
Horse sketching is a skill you build over time. Here’s how you can practice, depending on your level:
- Beginner: Focus on basic shapes, proportions, and simple poses.
- Intermediate: Add shading, muscle details, and more complex poses.
- Advanced: Draw horses from memory, include backgrounds, and experiment with different styles.
If you’re stuck, try copying famous horse sketches by artists like Leonardo da Vinci. Notice how they capture movement and anatomy.
Using Technology: Digital Horse Sketching
Digital art tools make horse sketching easier in some ways. Programs like Adobe Photoshop, Procreate, and Krita let you:
- Undo mistakes quickly
- Use layers to separate parts of your sketch
- Add shading and color with brushes
Digital sketching also lets you adjust proportions easily. Many digital artists start with a rough sketch, then refine it on a new layer.
But digital tools can’t replace practice. Even in digital art, understanding horse anatomy and proportions is key.
Finding Inspiration And Reference
To improve your horse sketches, look for inspiration in books, museums, and online galleries. Famous artists like George Stubbs and Rosa Bonheur created incredible horse art. You can also find reference images at sites like Wikipedia.
Study how other artists draw horses. Notice the way they use lines, shading, and composition. Try sketching in different styles—realistic, cartoon, or abstract—to find your own approach.
Frequently Asked Questions
What Is The Best Pencil For Horse Sketching?
For sketching horses, start with an HB pencil for light lines, then use 2B or 4B pencils for shading and darker outlines. These pencils let you adjust your lines easily and add depth to your drawing.
How Can I Fix Proportions If I Make A Mistake?
If your horse’s proportions are off, use an eraser to remove the problem area, then redraw with lighter lines. Compare your sketch to a reference photo and use measuring tools like a ruler or grid to help place features accurately.
Is It Easier To Draw Horses Digitally Or On Paper?
Both methods have pros and cons. Digital sketching lets you undo mistakes and use layers, but requires learning new tools. Paper sketching builds hand-eye coordination. Try both to see which suits your style.
How Long Does It Take To Learn Horse Sketching?
Most beginners need a few weeks of regular practice to draw basic horse sketches. To master advanced details and shading, it may take several months. Consistent practice and studying anatomy make a big difference.
Can I Draw Horses From Memory?
Drawing from memory is possible after lots of practice. Start by sketching from reference images, then gradually try drawing without them. Remembering proportions and key features is easier with experience.
—
Drawing a horse step by step is a rewarding challenge. By breaking the process into simple shapes, focusing on anatomy, and practicing regularly, you’ll improve your sketches quickly. Use reference images, try different breeds, and don’t be afraid to make mistakes—each drawing teaches you something new.
Whether you want to capture a horse’s power, grace, or personality, these steps will guide you to create art you’re proud of.

Credit: cecilieo.com