
Drawing a horse can feel like magic for kids. Horses are graceful, full of energy, and have a shape that is both simple and tricky. Many children want to draw a horse, but they may struggle with the details. The good news is, anyone can learn to draw a horse step by step.
This guide is made for kids and parents who want clear instructions, easy words, and practical advice.
Let’s start the creative journey. You will learn how to draw a horse, from simple shapes to a complete animal. Along the way, you’ll pick up tips to make your drawing better and understand horse anatomy without confusion. Whether you are a young artist or a parent helping your child, this article will show you everything you need, step by step, with no missing parts.
Why Drawing Horses Is Great For Kids
Drawing horses is more than just fun. It helps kids grow in many ways:
- Creativity: Each drawing is unique. Kids can use their imagination to add color, backgrounds, and stories. Some children even invent magical horses, like unicorns or flying horses, which makes their drawings extra special. They might draw their horse wearing a hat, running in a rainbow field, or as a cartoon character.
- Observation: Horses have special shapes. Kids learn to notice details like legs, ears, and mane. By looking closely, children start to see how horses move and what makes them different from other animals, like dogs or cats. They may spot how the tail swings or how the ears turn.
- Patience: Drawing step by step teaches focus and waiting for results. Sometimes, lines don’t come out right. Kids learn to erase and try again, which is an important skill for school and life.
- Motor Skills: Sketching, erasing, and coloring help control hand movements. This is good for writing, cutting, and other activities.
Research shows art activities improve children’s thinking and confidence. When kids create pictures, they feel proud and want to show their art to others. Kids who draw regularly often do better in school and feel happier. Drawing horses is also a way to connect with nature and animals, especially for kids who love horses or dream about riding them.
Some children discover new interests after drawing horses. They may want to learn about horse breeds, horse care, or horse riding. Drawing can be the start of a lifelong passion.
Basic Materials Needed
You don’t need expensive supplies to draw a horse. Most materials are easy to find at home or school. Here’s what you need to get started:
- Paper: Any white paper works. Try to use a smooth sheet without lines. Drawing on rough paper can make it harder to erase mistakes.
- Pencils: A regular pencil is good. If you want details, use a sharp pencil. Some artists use different pencils for soft and hard lines. For young kids, thick pencils are easier to hold.
- Eraser: Mistakes happen. An eraser helps you fix lines easily. Soft erasers work better for gentle paper.
- Colored pencils or crayons: For coloring your horse at the end. Markers can also be fun, but they cannot be erased.
- Ruler (optional): To help draw straight lines, especially for beginners. It can be used for fences or background shapes.
If you want to keep your drawing safe, you can also use a folder or plastic cover. For young children, large paper and thick pencils are easier to hold. Sometimes, kids like to draw on colored paper or use glitter pens for decoration.
If you want to try digital drawing, you can use a tablet or phone with a drawing app. Many apps allow you to undo mistakes and try different colors easily.
Understanding Horse Anatomy For Drawing
Before you start drawing, it helps to know the basic horse anatomy. Horses have special body parts that make them look different from other animals. Here are the most important features:
- Head: Long, with a rounded nose and small ears. The head is not a perfect circle. It’s shaped more like a stretched oval.
- Neck: Thick and strong, curving from head to body. The neck is wider at the bottom and thinner near the head.
- Body: Large and oval-shaped, with muscles. The body is smooth, but you can see muscle lines if you look closely at photos.
- Legs: Four long legs, each with joints and hooves. Horse legs bend in different places, not just straight lines.
- Tail: Long hair at the back, flowing down. The tail starts thick and gets thinner at the end.
- Mane: Hair along the neck, sometimes wavy or straight. The mane can be short, long, or standing up, depending on the horse.
Knowing these parts helps you draw a horse that looks real. Many beginners forget the shape of the legs or make the head too round. Keep these features in mind as you follow the steps.
When you look at a real horse or a photo, notice where the legs bend, how the ears point, and how the mane falls. These details are important to make your drawing look like a horse and not another animal.
Comparison Of Horse And Pony Anatomy
Sometimes kids draw ponies instead of horses. Ponies are like small horses, but their bodies are different. Here is a simple comparison:
| Feature | Horse | Pony |
|---|---|---|
| Height | Over 14.2 hands | Under 14.2 hands |
| Body Shape | Long and lean | Short and round |
| Legs | Long and thin | Short and thick |
| Mane and Tail | Usually thinner | Often thick |
Ponies look cute because they have round bodies and short legs. If you want to draw a pony, use rounder shapes and shorter legs. For a horse, keep the body longer and the legs tall.
Some children may want to draw a baby horse, called a foal. Foals have big eyes, shorter bodies, and longer legs compared to their size. If you draw a foal, make the head a little bigger and the legs thin.
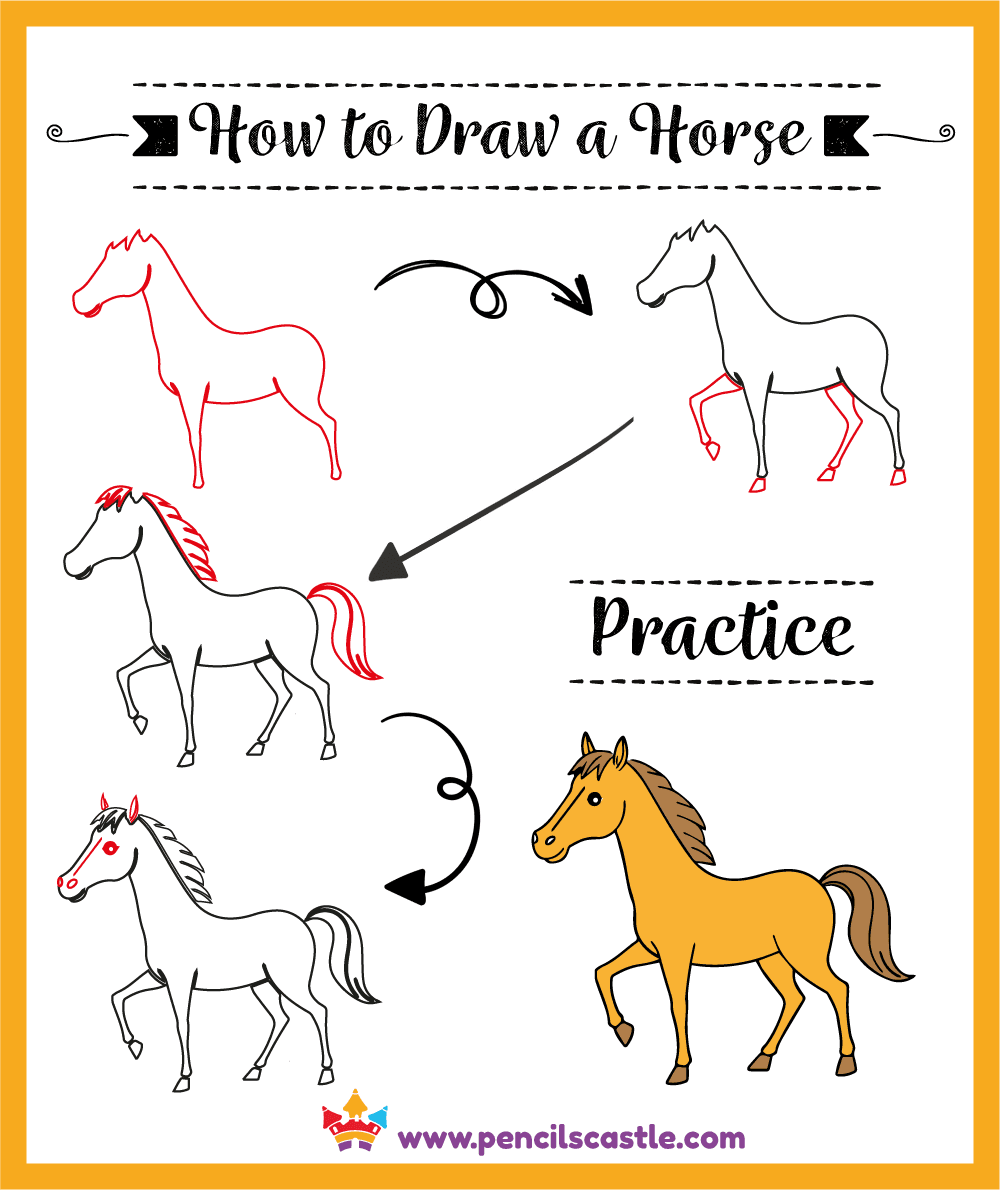
Step By Step Guide: Drawing A Horse For Kids
This section will give you clear steps to draw a horse. Each step is simple, with easy shapes. You can follow along with your pencil and paper.
Step 1: Drawing The Basic Shapes
Start with the main shapes. This makes the drawing easier:
- Draw a big oval for the body. Place it in the middle of the paper. If your paper is small, make the oval smaller.
- Draw a smaller oval for the head, above and to the left of the body. Make sure it’s not too close or too far.
- Connect the head and body with two curved lines for the neck. The neck should be wide at the bottom and narrow at the top.
- Draw four straight lines coming down from the body for the legs. These lines will be guides for the legs.
Don’t worry about details yet. Use light pencil strokes so you can erase later. If you press too hard, it is hard to fix mistakes.
Some kids find it helpful to use a ruler for the leg lines. Others like to freehand. Both are fine. The important thing is to keep the shapes simple.
Step 2: Shaping The Head And Neck
Now, add details to the head and neck:
- Draw two small triangles on top of the head for the ears. Horse ears are not very big and point upwards.
- At the front of the head oval, draw a rounded shape for the nose. The nose is softer and wider than the rest of the head.
- Add a curve at the bottom of the head for the jaw. This makes the head look more like a horse and less like a dog.
- Make the neck thicker by drawing another line next to the first one. Horses have strong necks, so don’t make them thin.
Kids often make the neck too thin. Horses have strong necks, so make your lines bold. If you look at pictures, notice how the neck connects smoothly to the body.
Try to keep the head shape long, not round. If your horse looks like a rabbit, try making the head more oval.
Step 3: Outlining The Body
Use the oval shape as a guide. Make the body look more natural:
- Smooth out the oval so it looks like a horse’s side. Add gentle curves instead of sharp lines.
- Draw a small bump at the back for the hip area. This is where the back leg connects.
- Add a line at the bottom for the belly. Horses have a round belly, but not too big.
Pay attention to the body’s size. If you want a young horse, make the body shorter.
Some kids like to add a line for the back. You can make the back curve a little to show movement. If your horse is running, make the body lean forward.
Step 4: Drawing The Legs
Legs are tricky. Horses have joints and hooves. Here’s how to draw them:
- Divide each straight leg line into three parts (upper, middle, lower). These are the shoulder, knee, and hoof areas.
- At each joint, draw a small circle for the knees or ankles. This helps show where the legs bend.
- At the end of each leg, draw a small rectangle for the hoof. Hooves are flat on the bottom and round on top.
Make sure the front legs are straighter and the back legs have a little bend. Horses often stand with their back legs bent.
If you want your horse to run, stretch the legs out. For jumping, bend the legs more. Some kids add extra joints, but horses only have one bend in each leg.
Take your time with the legs. If they look too short, make them longer. If they look too thick, use thinner lines.
Step 5: Adding The Tail And Mane
These features make the horse look lively:
- Draw a curved line from the back for the tail. Make the tail thick at the base and thinner at the end.
- For the mane, draw wavy lines along the neck. You can make the mane short or long.
Kids often forget the mane’s direction. It flows with the neck’s curve. If your horse is running, draw the mane and tail flying back.
You can add extra lines to show hair in the mane and tail. Try mixing two colors for a fun effect.
Step 6: Drawing The Face
Give the horse personality by adding face details:
- Draw a small oval for the eye. Horse eyes are large and placed high on the head, near the ears.
- Add two small lines for the nostrils. The nostrils are wide and open, near the end of the nose.
- Draw a curved line for the mouth. Horses have soft mouths, not sharp.
If you want a friendly horse, make the eye big and add eyelashes. For a strong horse, use smaller eyes and darker lines.
Some kids like to add eyebrows, but real horses do not have eyebrows. You can add them for a cartoon effect.
Step 7: Final Outline
Go over your drawing with a darker pencil or marker:
- Trace all the main lines. Use smooth strokes for the body and legs.
- Erase the extra shapes and guide lines. This makes your horse look neat.
Now your horse is ready for coloring! If you want, you can add extra details like muscles, veins, or spots.
Coloring Your Horse Drawing
After drawing, coloring brings your horse to life. Here are easy ways to color your horse:
- Brown: Most horses are brown. Use light brown for the body and dark brown for the mane and tail. Add a little yellow or orange for highlights.
- White: For a white horse, leave most areas blank and color the mane and tail gray. Use a light blue pencil to show shadows.
- Black: Black horses look strong. Use black for the body and lighter gray for the nose. You can add shiny spots with a white pencil.
- Spots and Stripes: Some horses have spots (Appaloosa) or stripes (Zebra). Add small dots or lines if you want. For a fantasy horse, use bright colors like pink or purple.
Use colored pencils or crayons. Start light, then add darker colors for shading. If your horse is running, add dust under the hooves. For extra fun, draw grass or a fence in the background.
Some kids like to use watercolors or markers. These can make your horse look bright and bold. If you use markers, be careful not to press too hard.
How Coloring Affects The Drawing
Color changes how your horse looks. Here’s a simple comparison:
| Color Choice | Effect on Drawing |
|---|---|
| Light Colors | Makes the horse look young and gentle |
| Dark Colors | Shows strength and power |
| Bright Colors | Creates a fantasy horse, good for imagination |
| Natural Colors | Looks realistic, good for learning |
Kids often mix colors for the mane and tail. This makes the drawing more interesting.
Try blending two colors for shading. For example, use brown and yellow for a golden horse. If your horse is in the sun, add light spots. If it’s in the shade, use darker colors.
Practical Tips For Kids Drawing Horses
Drawing a horse can be hard at first. Here are tips to help you get better:
- Practice shapes: Draw ovals and circles before starting. This helps with the body and head.
- Look at pictures: Study photos of real horses. Notice their legs, ears, and tail. Try to copy the pose and details.
- Draw slowly: Take your time with each step. Fast drawing leads to mistakes. If you rush, you may miss important details.
- Use light lines first: Easy to erase if you change your mind. Heavy lines are hard to fix.
- Start simple: Draw standing horses before trying running or jumping poses. When you feel confident, try new poses.
- Ask for help: Parents or teachers can guide you if you get stuck. Sometimes, two people see things differently and can help each other.
Many beginners make the legs too short or the body too big. Check your drawing often and compare it to real horses. If you look at a photo, notice how the legs are almost as long as the body.
Try drawing the same horse twice. The second time, you may see improvement.
Common Mistakes And How To Fix Them
Kids often make these mistakes:
- Head too round: Make the head longer, like a carrot shape. Use a stretched oval, not a circle.
- Legs too thick: Use thin lines for legs, then add muscle later. If legs look like tree trunks, erase and try again.
- Tail too thin: Make the tail thick at the start. Horses have strong tails.
- Mane too short: Draw the mane along the whole neck. If the mane stops halfway, extend it.
If you see these in your drawing, erase and try again. Mistakes are part of learning.
Another common mistake is forgetting the hooves. Make sure each leg ends with a flat rectangle or triangle for the hoof.
Adding Background And Details
A horse looks even better with a background. Here are ideas:
- Grass and flowers: Draw green lines for grass and small circles for flowers. You can make a field or meadow.
- Fence: Draw two or three straight lines for a wooden fence behind the horse. Add vertical lines for posts.
- Sun and clouds: Add a sun in the corner and fluffy clouds above. Use yellow for the sun and blue for the sky.
- Barn: Draw a simple rectangle with a triangle roof for a barn. Add a door and windows.
Kids often forget the shadow under the horse. Draw a light oval under the hooves for shadow. This makes your drawing look real.
You can also add other animals, like birds or butterflies. For extra detail, draw a saddle or bridle on the horse.
If you want your horse to look like it’s moving, add lines behind the legs to show motion.
Drawing Horses In Different Poses
Once you learn the basic horse, you can try new poses. Here’s how to draw horses standing, running, and jumping:
Standing Horse
- Legs are straight, body is calm.
- Draw the hooves flat on the ground.
- Keep the mane and tail relaxed.
This pose is easiest for beginners. The horse looks peaceful and still.
Running Horse
- Legs are stretched out, two in front, two in back.
- Mane and tail fly in the wind.
- Body leans forward.
This pose shows action. Draw the legs long and stretched. Add lines for speed.
Jumping Horse
- Front legs are up, back legs are bent.
- Head is up, ears forward.
- Tail is lifted.
This pose is more advanced. Draw the horse over a fence or a log.
To draw these poses, use more curved lines and change the leg shapes. Look at photos for ideas.
Some kids like to invent their own poses. Try drawing a horse sitting, rolling, or rearing up.
Pose Comparison
Here’s a simple table to show the differences:
| Pose | Legs | Body | Mane/Tail |
|---|---|---|---|
| Standing | Straight | Calm | Relaxed |
| Running | Stretched | Leaning | Flying |
| Jumping | Bent | Lifted | Raised |
Try each pose after you finish your first horse. This will make you a better artist.
Using References To Improve Your Horse Drawing
Looking at real horses or pictures helps you draw better. Here’s how to use references:
- Find horse photos online or in books. Look for side views, close-ups, and action shots.
- Notice the shapes: Head, neck, body, legs. Compare your drawing to the photo.
- Try to copy the pose, but keep your drawing simple. Focus on the main shapes.
- Use cartoons or coloring books for easy horse shapes. These are good for young children.
Many artists use references to improve accuracy. Don’t worry if your drawing looks different. Every horse is unique.
If you want to find good reference photos, you can check the Wikipedia Horse page for images and facts.
Some kids like to trace photos for practice. This can help learn the shapes, but try drawing freehand for creativity.
How Drawing Horses Helps Kids Learn
Drawing horses is not just art. It also helps kids learn important skills:
- Math: Measuring shapes and lines improves counting and size comparison. When drawing legs, kids learn about length and proportion.
- Science: Learning about horse anatomy teaches animal biology. Children may ask about horse breeds, food, and habitats.
- Language: Talking about the drawing builds vocabulary and speaking skills. Kids learn words like mane, hoof, and bridle.
Kids who draw animals often ask questions about nature and want to learn more. Drawing horses can spark interest in reading, writing, and outdoor activities.
Some teachers use horse drawing in lessons about farm animals or history. Drawing connects art with other subjects.
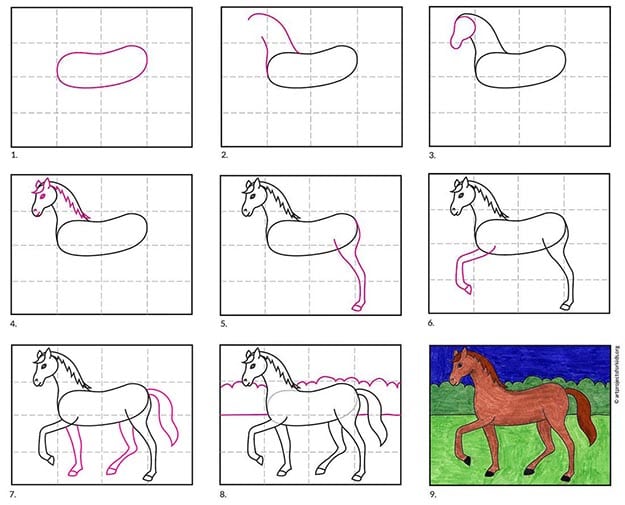
Step By Step Example: Drawing A Simple Horse
Let’s draw a horse together. Follow these steps:
- Draw a big oval for the body.
- Draw a small oval for the head, above and to the left.
- Connect head and body with two curved lines for the neck.
- Draw two triangles for ears on the head.
- Add four lines for legs coming down from the body.
- Draw small circles for joints and rectangles for hooves.
- Add a curved tail at the back.
- Draw wavy lines for the mane along the neck.
- Add an eye, nostrils, and mouth on the head.
- Trace the main lines with a darker pencil.
- Erase guide shapes.
- Color the horse brown, black, or white.
- Draw grass, sun, and fence for background.
If you are younger, ask an adult to help with tracing and coloring.
Try drawing the horse again in a different pose. Practice makes perfect.
Horse Drawing For Different Ages
Drawing horses is fun for all ages. Here’s how to adjust the steps for different age groups:
Young Children (5–7 Years)
- Use big shapes and thick pencils.
- Skip details like joints and hooves.
- Focus on the main body, head, and tail.
- Use bright colors and simple backgrounds.
Older Children (8–12 Years)
- Add more details: Ears, mane, hooves.
- Try different poses: Running, jumping.
- Use shading and color blending.
- Draw backgrounds with trees, barns, or other animals.
Teens
- Study horse anatomy more closely.
- Draw muscles and realistic mane.
- Experiment with backgrounds and scenery.
- Try digital drawing on tablets.
Parents can help by showing pictures and giving feedback. Remember, every drawing is good if you tried your best.
Some teens use art books or watch videos to learn advanced techniques.
Advanced Tips For Improving Horse Drawings
If you want to get even better, here are advanced tips:
- Add muscles: Draw lines along the legs and body to show muscles. Look at photos for guidance.
- Try shading: Use dark and light colors to show sunlight and shadows. This makes your horse look three-dimensional.
- Draw from memory: After using references, try drawing a horse without looking. This builds skill.
- Use different pencils: Try soft and hard pencils for different effects. Soft pencils make dark lines; hard pencils make light lines.
- Mix colors: Blend two colors for a realistic mane or tail. Try brown and black, or yellow and brown.
Kids who use these tips often see big improvement. Advanced drawing takes time, so don’t rush.
Try drawing a horse with a saddle or rider. Add details like reins or boots.
How To Fix Common Horse Drawing Problems
Sometimes, you finish your horse drawing and something feels wrong. Here’s how to fix common problems:
Problem: Head Too Big
- Solution: Erase and redraw the head smaller.
- Tip: The head should be about one-third the size of the body.
Problem: Legs Too Short
- Solution: Extend the leg lines down.
- Tip: Legs are almost as long as the body.
Problem: Tail In Wrong Place
- Solution: Start the tail at the back, near the hip.
- Tip: Tail should flow with the horse’s movement.
Problem: Mane Looks Stiff
- Solution: Draw wavy lines, not straight.
- Tip: Mane follows the neck’s curve.
Fixing these problems makes your drawing look better and helps you learn.
Some kids make the nostrils too small or too big. Look at photos to see the right size.

Credit: www.easypeasyandfun.com
Fun Activities With Your Horse Drawing
After you draw your horse, try these fun activities:
- Make a story: Write a short story about your horse. Where does it live? What is its name? Who are its friends?
- Draw a herd: Draw two or more horses together. Try different colors and poses. Maybe add a foal or a pony.
- Create a poster: Decorate your drawing and hang it on your wall. Add a title or your name.
- Send as a card: Give your horse drawing to a friend or family member. Write a message on the back.
- Use stickers: Add stickers for flowers, birds, or other animals. Decorate the background.
Kids who do these activities feel proud of their art and share it with others.
You can also make a comic strip or a storybook with your horse drawings.
Comparing Horse Drawing Styles
There are many styles for drawing horses. Here are three main styles:
| Style | Description | Best For |
|---|---|---|
| Realistic | Detailed, true to life | Older kids and teens |
| Cartoon | Simple, big eyes, fun shapes | Young children |
| Fantasy | Bright colors, wings, unicorn horns | Imaginative artists |
Try each style to see which one you like best. Cartoon horses are good for beginners. Realistic horses need more practice.
If you like fantasy, try drawing a unicorn, pegasus, or rainbow horse.
Using Technology For Horse Drawing
Many kids use drawing apps and tablets today. Here’s how technology can help:
- Apps: Use apps like Kids Doodle or Procreate to draw horses digitally. These apps offer many colors and tools.
- Tracing: Download horse outlines and trace them on your tablet. This helps you learn shapes.
- Coloring: Digital coloring lets you try many colors without mess. You can undo mistakes easily.
- Sharing: Send your horse drawing to friends online. Share on social media or art websites.
Parents can help set up apps and guide children. Digital drawing is good for practicing, but traditional paper drawing builds hand skills.
Some apps offer step by step guides or coloring pages. Try both digital and paper to see which you prefer.
Horse Drawing Competitions And Sharing Art
Kids love to share their art. Here are ways to show your horse drawing:
- School competitions: Join drawing contests at school. Sometimes, schools have animal drawing days.
- Online galleries: Post your drawing on websites like Artsonia. You can see other kids’ art and get ideas.
- Family shows: Hang your drawing in the living room. Ask family to give feedback.
- Art fairs: Take your drawing to local fairs and display it. Meet other artists and learn new tips.
Competitions can motivate kids to improve. But remember, drawing is for fun, not just winning.
Some kids start their own art club at school or with friends.
How Parents And Teachers Can Support Kids
Parents and teachers play an important role. Here’s how they can help:
- Encourage practice: Remind kids that drawing takes time. Praise effort, not just results.
- Give feedback: Point out what looks good and what can improve. Be gentle and positive.
- Provide materials: Make sure kids have paper, pencils, and colors. Try new materials for fun.
- Show examples: Share horse pictures and cartoons. Visit museums or watch videos.
- Celebrate progress: Keep old drawings and see improvement. Make a scrapbook or album.
Support from adults makes kids feel confident and happy about their art.
Teachers can include horse drawing in lessons about animals, nature, or history.
Horse Drawing For Kids With Special Needs
Drawing is for everyone. Kids with special needs can enjoy horse drawing too:
- Use thick pencils: Easier to hold for kids with motor difficulties.
- Draw big shapes: Simple lines and circles are easier to see.
- Allow extra time: No rush, let kids draw at their own pace.
- Adapt steps: Skip complex details if needed.
- Celebrate all art: Every drawing is special, no matter the style.
Art therapy experts say drawing animals helps all kids, including those with learning or physical challenges.
Some schools offer special art classes for kids with disabilities. Drawing can help with communication and relaxation.
Horse Drawing And Emotional Benefits
Drawing horses can help kids feel calm and happy. Studies show art reduces stress and builds self-esteem. Horses are gentle animals, and drawing them can make kids feel peaceful.
If your child is feeling sad or worried, encourage them to draw a horse. Art is a safe way to express feelings.
Some children use colors to show emotions. Blue for calm, red for energy, green for happiness.
Step By Step Drawing For Groups
Drawing in a group is fun. Here’s how to organize a group horse drawing activity:
- Give each child paper and pencil.
- Show steps on a board or screen.
- Draw together, one step at a time.
- Share drawings and talk about what you like.
- Display all drawings on a wall.
Group drawing builds teamwork and friendship.
You can have a “horse gallery” in the classroom or at home.
Credit: pencilscastle.com
Horse Drawing For Learning English
If you want to learn English, drawing horses can help:
- Learn new words: Head, mane, tail, hoof, ear.
- Practice writing: Describe your horse in English.
- Talk about your drawing: Share with friends or teachers.
Drawing and language go together. Kids who draw and talk about their art learn faster.
Try labeling parts of the horse in English. Write a short story about your drawing.
Creating A Horse Drawing Portfolio
Keep your horse drawings in a folder or binder. This is called a portfolio. Here’s why it matters:
- Shows your progress over time.
- Helps you remember how you improved.
- Makes it easy to share with others.
- Builds confidence.
Add dates to each drawing and write a short note about what you learned.
Some kids use their portfolio for school projects or art competitions.
Non-obvious Insights For Horse Drawing
Here are two insights many beginners miss:
- Horse eyes are placed high: Many kids draw the eye low on the head. Real horse eyes are near the top, close to the ears. Look at photos for placement.
- Hoof shape is not round: Horse hooves are more like a triangle with a flat bottom. Avoid making them circles.
These details make your horse look more real.
Another tip: Horses’ ears are usually pointed forward when they are alert. Try drawing ears in different directions for mood.
How To Turn Your Horse Drawing Into A Craft
You can use your drawing for crafts:
- Cut out your horse and glue it to colored paper.
- Make a horse mask by cutting holes for eyes and attaching a string.
- Create a horse mobile by hanging drawings from a stick.
- Make bookmarks by drawing small horses and laminating.
Crafts add fun to your art and can be gifts for friends.
Try making a horse puzzle by cutting your drawing into pieces.
Drawing Other Animals After Horses
Once you can draw a horse, try other animals:
- Dogs: Similar body shapes, shorter necks.
- Cats: Rounder bodies, long tails.
- Cows: Thick bodies, horns.
- Zebras: Same shape as horse, add stripes.
Learning to draw one animal helps with others. Practice shapes and details for each new animal.
Try drawing a horse and a dog together in a scene.
Horse Drawing Books And Resources
Many books and websites teach horse drawing. Here are a few:
- How to Draw Horses by Lucy Smith: Easy steps and examples.
- Drawing Horses and Ponies by Peter Gray: Detailed guide for older kids.
- YouTube: Watch videos of artists drawing horses.
- Pinterest: Find step by step horse drawing ideas.
If you want more help, search for “horse drawing for kids” online.
Ask teachers or parents for book recommendations.
Real-world Examples: Famous Horse Drawings
Many famous artists have drawn horses:
- Leonardo da Vinci: Studied horse anatomy and made sketches. His drawings show detailed muscles and movement.
- George Stubbs: Painted horses in England. He is known for realistic horse portraits.
- Edgar Degas: Drew horses at races. His art shows horses in action.
You can find their drawings in museums and books. Famous horse art inspires kids to try new ideas.
Some museums have horse statues and paintings. Visit if you can.
Frequently Asked Questions
How Can I Make My Horse Drawing Look More Realistic?
To make your horse drawing realistic, focus on the shape of the head, body, and legs. Study photos of real horses and notice details like the placement of the eyes, the curve of the neck, and the shape of the hooves. Use shading to show muscles and add highlights with a white pencil. Don’t rush—take your time with each step.
Look at how the legs bend and where the tail starts. Realistic drawings use gentle curves and correct proportions.
What Is The Easiest Way For Kids To Draw A Horse?
The easiest way is to start with simple shapes—ovals for the body and head, lines for the legs, triangles for the ears. Build your horse step by step. Use light pencil lines for guides and erase mistakes as you go. Focus on the main features first, then add details like the mane and tail.
Try drawing a cartoon horse with big eyes and a smiling mouth for fun.
How Can I Fix Mistakes In My Horse Drawing?
Mistakes are normal. Use an eraser to fix lines that are too big or small. If you can’t erase, draw over the mistake with a darker pencil. Compare your drawing to a photo and look for parts that seem off, like the legs or head. Practice helps you get better each time.
You can also start a new drawing if you feel stuck.
Can I Draw A Horse Using A Tablet Or Phone?
Yes, you can use drawing apps on a tablet or phone. Many apps have tools for tracing, coloring, and erasing. Digital drawing is good for trying new poses and colors. But practicing on paper is also important for building hand skills.
Try both digital and paper drawing for best results.
What Are Good Resources For Learning Horse Drawing?
Good resources include books, websites, and videos. Try “How to Draw Horses” by Lucy Smith, or watch YouTube tutorials. For reference images and facts, visit the Wikipedia Horse page. Ask teachers or parents for more ideas.
Drawing a horse step by step is a rewarding activity for kids. It builds creativity, patience, and confidence. Whether you draw for fun or learning, each horse is special. Keep practicing, try new poses and styles, and don’t forget to share your art with friends and family.
Your horse drawing journey starts here—enjoy every step!
Credit: artprojectsforkids.org