
Every child feels a sense of wonder when they look at a horse. With their flowing manes and powerful bodies, horses seem almost magical. Many kids want to draw horses, but they often feel it’s too hard. The truth is, you don’t need to be an art genius to draw a horse.
Anyone can do it if they break the process into simple steps. This guide will show you exactly how to draw a horse, step by step, with clear instructions, practical tips, and solutions for common mistakes. Whether you are a parent, teacher, or a young artist, this article will help you succeed.
Why Drawing Horses Matters For Kids
Drawing is more than just a fun activity. It develops fine motor skills, helps with focus, and boosts creativity. Horses, in particular, are great subjects because they combine simple shapes with more complex features. By learning to draw a horse, kids also learn to look closely, observe details, and build their confidence in art.
Some children get discouraged when their horse doesn’t look “right. ” This is normal! Even professional artists start with basic shapes and simple lines. The key is to practice, be patient, and enjoy the process.
What You Need To Start
You don’t need expensive art supplies to draw a horse. Here’s a basic list of what you’ll need:
- Paper: Plain white paper works best. You can use sketchbooks or printer paper.
- Pencils: Use a regular HB pencil for sketching. Mechanical pencils are fine, too.
- Eraser: A soft eraser helps fix mistakes easily.
- Sharpener: Keep pencils sharp for clear lines.
- Coloring tools: Colored pencils, markers, or crayons (optional).
If you want to take your drawing further, you can try fine-tip black pens to outline your horse at the end.
Understanding The Horse’s Basic Shapes
Before you start, look at a photo of a horse. Notice how the body is made of simple shapes. The head is like a long oval, the body is a bigger oval, and the legs are straight lines. By seeing these shapes, the horse becomes much easier to draw.
Here’s a quick comparison of how beginners and experienced artists see a horse:
| Level | How They See a Horse | Drawing Approach |
|---|---|---|
| Beginner | Complex, confusing | Draws the outline directly |
| Experienced Artist | Simple shapes put together | Builds with circles, ovals, lines |
This approach—starting with simple shapes—makes even a tricky animal like a horse easy for kids.
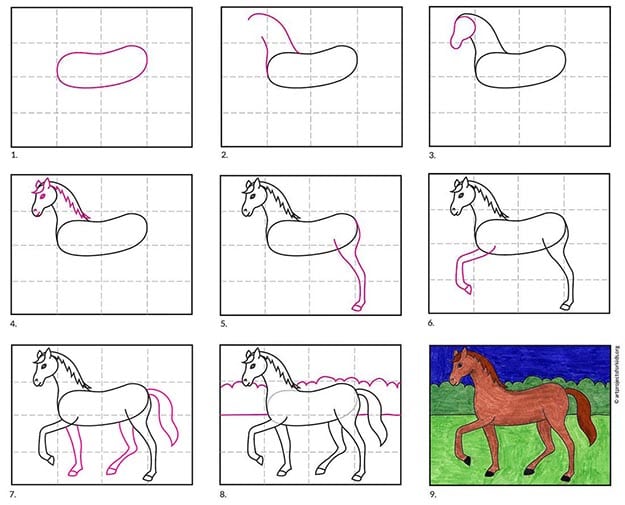
Step-by-step Guide: Drawing A Horse
Let’s break down the process into clear steps. Each step builds on the last, so you won’t get lost.
Step 1: Draw The Body
Start with a large oval tilted slightly forward. This will be the horse’s main body. Don’t press too hard; you’ll erase some lines later.
- Place the oval in the center of the page.
- Make it about the size of your palm.
Step 2: Add The Head
Draw a smaller oval to the right or left of the body oval (depending on which way your horse is facing). This will become the head.
- The head oval should be about one-third the size of the body.
- Connect the two ovals with a short, curved line (this is the neck).
Step 3: Sketch The Neck
Use two curved lines to join the head and body. The neck should be thick at the base (near the body) and thinner near the head.
- Make the top line slightly curved.
- The bottom line curves less.
Step 4: Draw The Legs
Horses have four legs. Start with the two legs closest to you (these are called the “near legs”).
- Draw two straight lines down from the body for each leg.
- Add a small oval at the bottom for the hoof.
- The front legs are a bit straighter, while the back legs have a gentle bend.
After that, sketch the “far legs” behind the first set. These are slightly shorter and thinner to show depth.
Step 5: Shape The Head
Refine the head oval to make it look more like a horse’s head.
- Add a small bump for the nose.
- Draw a straight line for the jaw.
- Horses have long, thin faces—don’t make it too round.
Step 6: Add Ears And Eyes
Draw two pointed ears on top of the head. Horses’ ears are alert and forward.
- Place a small circle for the eye about halfway down the head.
- Add a nostril with a short curved line near the nose.
Step 7: Draw The Mane And Tail
Now Comes The Fun Part!
- For the mane, draw wavy lines starting behind the ears and following the curve of the neck.
- The tail is like a thick, long brush. Start from the back of the body and sweep it down with several curved lines.
Step 8: Shape The Body And Legs
Go back and refine your lines. Make the chest a little wider and the hindquarters rounder.
- Erase the extra lines from your first ovals and guides.
- Thicken the legs where they meet the body.
Step 9: Draw Hooves And Details
- Make the hooves with two straight lines and a flat bottom.
- Add a line above each hoof to show the “ankle.”
- Put a line down the middle of the face for more detail.
Step 10: Outline And Color
Now, use a black pen to trace over your final lines (optional). Once the ink is dry, erase any remaining pencil marks.
- Color your horse any way you like! Brown, black, white, or even rainbow.

Credit: www.easypeasyandfun.com
Common Mistakes Kids Make (and How To Fix Them)
Even with clear steps, kids often run into problems. Here are some of the most common mistakes and how to solve them:
- Horse Looks Like a Dog or Cow
- Solution: Check the head shape and leg length. Horses have long faces and long, thin legs.
- Short Legs
- Solution: Legs should be about the same length as the body is tall.
- Tiny Ears
- Solution: Make ears pointy and about one-third the length of the head.
- Forgotten Hooves
- Solution: Always add the small ovals at the ends of the legs.
- Too Many Dark Lines
- Solution: Sketch lightly first, then darken only the final lines.
It’s normal to make these mistakes. The more you practice, the better your horses will look.
Making Your Horse Drawing Unique
Every horse is different—so your drawings should be, too! Here are some ways to add personality:
- Change the mane style: Long and flowing or short and spiky.
- Add spots, stripes, or markings.
- Draw your horse running, jumping, or sleeping.
- Put a saddle or rider on your horse.
By changing just a few details, you can make your horse drawing truly your own.
Credit: artprojectsforkids.org
Practical Tips For Parents And Teachers
Helping kids draw horses can be a great bonding activity. Here are some practical tips to make the experience better:
- Draw alongside them. Kids learn by watching adults.
- Break steps into smaller parts. If a child struggles, focus on just the head, or just the legs.
- Celebrate effort, not just results. Every drawing is progress.
- Use real horse photos for reference.
- Encourage creativity. Let kids choose their own colors or backgrounds.
How Drawing Horses Improves Artistic Skills
Drawing a horse isn’t just about horses—it helps kids learn many artistic skills. Here’s how:
| Skill | How Drawing Horses Helps |
|---|---|
| Observation | Kids notice shapes, lines, and details in animals. |
| Proportion | Understanding how big or small parts should be compared to each other. |
| Patience | They learn not to rush and to fix mistakes. |
| Creativity | Kids can invent new types of horses with colors and patterns. |
These skills will help with all kinds of art, not just horses.
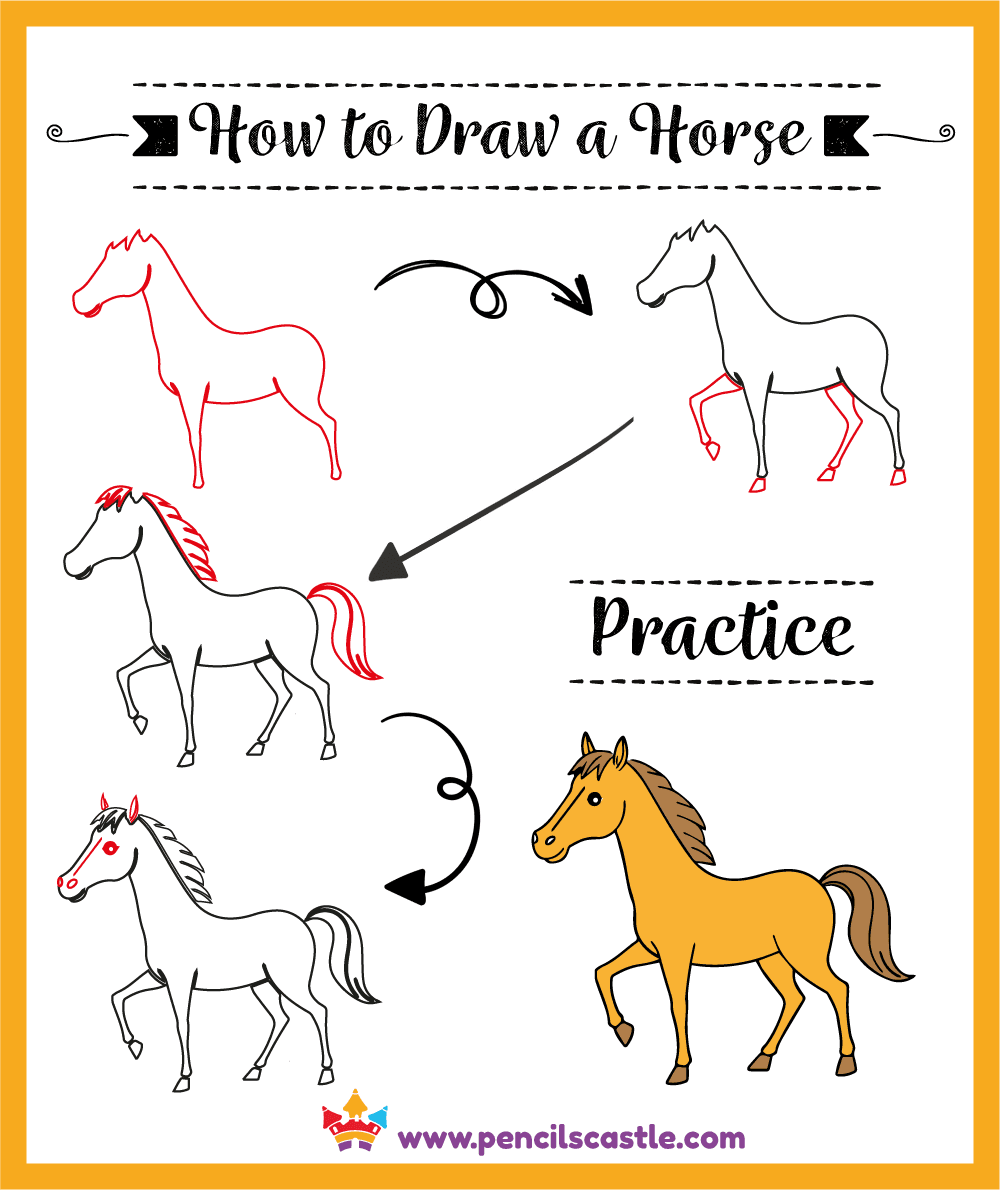
Credit: pencilscastle.com
Adding Backgrounds And Scenes
Once your horse is done, you can add a background to make your picture more interesting.
- Draw a fence or a barn behind the horse.
- Add grass under its feet.
- Draw a sun or clouds in the sky.
- Add other animals, like birds or cats.
Adding a background makes your drawing tell a story. For example, a horse in a field looks calm, while a horse jumping over a fence looks active.
Advanced Tips For Kids Who Want More
If you’ve mastered the basic horse, try these ideas:
- Draw horses in different poses. For example: Running, rearing, or sitting.
- Try shading. Use your pencil to add light and dark areas. This makes the horse look 3D.
- Study real horses. Watch videos or visit a farm.
- Learn horse anatomy. Notice where the joints are and how the muscles move.
Here’s a simple comparison of how a basic horse drawing compares to a more advanced one:
| Feature | Basic Drawing | Advanced Drawing |
|---|---|---|
| Shape | Simple ovals and lines | Detailed muscles and curves |
| Shading | Flat color | Light and shadow |
| Details | Basic mane and tail | Flowing mane, realistic hooves |
Don’t feel you have to start advanced—every artist begins with simple steps.
Real-world Examples: Famous Horse Drawings
Many famous artists have drawn horses. Leonardo da Vinci, for example, sketched horses to understand their muscles and movement. Kids can learn by looking at these drawings and seeing how the masters did it.
If you want to see some famous horse drawings, you can find examples on Wikipedia’s Horse in Art page.
The Power Of Practice
No one draws a perfect horse the first time. What matters is practice. Make a small goal: draw a horse every week. Over time, you’ll notice big improvements.
Here are two insights most beginners miss:
- Practice is more important than talent. Even great artists start with shaky lines.
- Comparing your progress, not your pictures. Don’t worry if your horse looks different from someone else’s. Compare your own drawings over time.
By practicing, you’ll not only draw better horses—you’ll become more confident in all your art.
Frequently Asked Questions
Why Do My Horse’s Legs Look Wrong?
Most kids draw horse legs too short or too thick. Remember: a horse’s legs are long and thin. Try making the legs about the same length as the body’s height, and use light lines to adjust before making them dark.
How Do I Draw A Horse’s Mane?
Start at the top of the horse’s head, behind the ears. Use wavy lines to follow the neck. Manes can be short and spiky or long and flowing. Don’t be afraid to make it wild—horses have all kinds of mane styles.
Can I Use Markers Instead Of Pencils?
Yes! Markers work well for coloring. But start your drawing with a pencil, so you can erase mistakes. Only use markers after you finish the lines you want to keep.
How Can I Make My Horse Look More Realistic?
Focus on the eyes, ears, and muscles. Add details like nostrils, eyelashes, and shading. Look at photos of real horses to see where the shadows and highlights are.
What Should I Do If I Make A Mistake?
Don’t worry—every artist makes mistakes. Use your eraser to fix small errors. If you can’t fix it, turn the mistake into something new. Maybe a bigger mane or a background tree. Remember, drawing is about having fun and learning.
Drawing a horse is a journey. Every time you pick up your pencil, you learn something new. With these step-by-step instructions and tips, you can draw horses that make you proud. The most important thing is to enjoy the process and keep creating.
Happy drawing!