Drawing horses with a pencil is a rewarding challenge for artists at any level. Horses have a unique beauty, strong muscles, and graceful movements. Capturing these details in your sketch requires patience, observation, and practice. Many beginners start with simple outlines, but to draw a realistic horse, you need to understand its anatomy, proportions, and shading techniques.
In this guide, you’ll learn how to draw horses step by step with a pencil, from basic shapes to finishing touches. Whether you want to sketch a galloping stallion or a calm mare, following these steps will help you create lifelike horse drawings.
Understanding Horse Anatomy
Before you start drawing, it’s important to study the horse’s body structure. Horses are made up of distinct shapes and muscles that influence their movement and appearance. Knowing these basics makes your drawing more accurate.
Key Parts Of The Horse
- Head: The horse’s head is long, with a strong jaw and a wide forehead. The nostrils and eyes are placed slightly above the mouth line.
- Neck: Horses have a muscular neck, often arched or straight depending on their pose.
- Body: The torso is barrel-shaped, with a deep chest and a strong back.
- Legs: Their legs are thin but muscular, ending in hooves.
- Tail: The tail is bushy and hangs from the base of the spine.
- Mane: The mane runs along the neck and can be straight or wavy.
Comparing Horse Anatomy With Other Animals
Here’s a simple comparison of horse anatomy and dog anatomy, which many artists confuse:
| Feature | Horse | Dog |
|---|---|---|
| Head Shape | Long, straight | Short, rounded |
| Neck | Long, muscular | Short, flexible |
| Body | Barrel-shaped | Compact, flexible |
| Legs | Thin, strong | Short, sturdy |
Notice how horses have longer, more defined features compared to dogs. Understanding these differences helps you avoid common mistakes.
Essential Drawing Tools For Horse Sketches
Choosing the right tools is key for pencil drawing. While you can use any pencil and paper, better materials give you more control and detail.
Basic Supplies
- Pencils: Use a range from 2H (hard) to 6B (soft). Hard pencils are good for light lines; soft pencils create dark shading.
- Eraser: A kneaded eraser lets you lighten areas without damaging paper.
- Paper: Choose smooth paper for fine lines, or textured paper for rough effects.
- Sharpener: Keep pencils sharp for detail work.
- Blending stump: Helps smooth out shading and create soft transitions.
Pencil Grades Comparison
Understanding pencil grades is important for shading and details. Here’s a quick comparison:
| Pencil Grade | Line Darkness | Best Use |
|---|---|---|
| 2H | Very light | Sketching outlines |
| HB | Medium | General drawing |
| 2B | Dark | Shading and shadows |
| 6B | Very dark | Deep shadows |
Use lighter pencils for sketching and darker pencils for shading.

Credit: www.shutterstock.com
Step-by-step Guide: Drawing A Horse With Pencil
Let’s break down the process. Drawing a horse takes several steps, from basic shapes to final details. Follow each step carefully, and don’t rush.
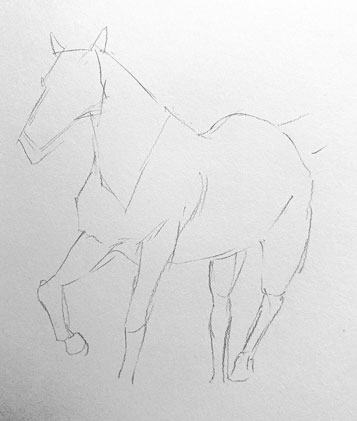
Step 1: Sketch Basic Shapes
Begin with simple shapes. Draw a circle for the head, an oval for the body, and lines for the neck and legs. This is your framework. It helps you place the horse’s parts correctly.
- Use a 2H pencil for light lines.
- Keep shapes loose; you’ll refine them later.
Step 2: Define Proportions
Horses have specific proportions. The body is about 2. 5 times longer than the head. The legs are long, and the neck is thick at the base.
- Measure the head length and use it to map the body and legs.
- Adjust shapes so they match horse proportions.
Step 3: Add Major Features
Draw the outline of the head, neck, body, and legs. Start shaping the nostrils, mouth, and eyes.
- Use an HB pencil for darker lines.
- Make sure the legs are straight and the body is balanced.
Step 4: Refine The Outline
Erase extra lines and refine the horse’s outline. Add curves to the neck, joints to the legs, and shape the hooves.
- Look at reference photos to get curves right.
- Use a kneaded eraser for gentle corrections.
Step 5: Draw The Mane And Tail
Sketch the mane along the neck. The tail should start thick at the base and get thinner. Use quick, curved lines for hair.
- Keep hair lines loose and flowing.
- Vary the length and direction for realism.
Step 6: Add Facial Details
Draw the eyes, nostrils, and mouth. Horses’ eyes are large and oval. The nostrils are wide and round.
- Use a 2B pencil for depth.
- Shade around the eyes for dimension.
Step 7: Start Shading
Shading gives your horse drawing depth. Identify where light falls (usually from above). Shade under the neck, belly, and legs.
- Use 2B and 6B pencils for dark shadows.
- Blend gently with a blending stump.
Step 8: Enhance Muscles And Texture
Add muscle lines along the legs, chest, and shoulders. Horses have visible muscle groups, especially when running.
- Use short, curved lines for muscles.
- Shade lightly to show texture.
Step 9: Final Details And Highlights
Add highlights on the nose, eyes, and mane. Use the eraser to lift graphite and create bright spots.
- Add small lines for hair and veins.
- Check proportions and fix any errors.
Step 10: Review And Adjust
Look at your drawing from a distance. Compare it with reference photos. Fix any mistakes in shape or shading.
- Adjust shadows for consistency.
- Add final touches to make it lifelike.
Common Mistakes Beginners Make
Drawing horses is tricky, and beginners often make similar mistakes. Avoiding these will improve your sketches.
- Wrong proportions: Many people make the head too big or legs too short. Use measuring techniques.
- Flat shading: Horses aren’t flat. Use shading to show muscles and curves.
- Stiff poses: Horses are dynamic. Use flowing lines for movement.
- Ignoring anatomy: Study real horse anatomy to understand muscle placement.
- Overusing eraser: Too much erasing can damage paper and make lines blurry.
A useful tip: Draw lightly and build up details. It’s easier to fix mistakes early in the process.
Practical Tips For Realistic Horse Drawings
To make your horse drawing stand out, use these practical tips:
- Use references: Look at photos or real horses. Notice how muscles and joints move.
- Work in layers: Start light, add details and shading gradually.
- Blend carefully: Blending stump or tissue can soften shadows, but don’t over-blend.
- Focus on eyes: Eyes add expression. Spend extra time detailing them.
- Vary pencil pressure: Press harder for dark areas, lighter for soft shadows.
Adding Depth And Movement
To show a horse in motion, use curved lines and dynamic poses. Horses running or jumping need strong lines and clear muscle details.
- Draw legs in different positions.
- Show mane and tail flowing with movement.
Example: Drawing A Galloping Horse
A galloping horse has stretched legs and a raised head. Sketch the body leaning forward, legs extended, tail lifted. Add shading under the belly to show speed.
Advanced Techniques For Pencil Horse Drawing
Once you’re comfortable with basic steps, try advanced techniques to improve realism.
Layered Shading
Build up shading in layers. Start with light pencil, add medium tones, then deep shadows. This technique gives depth and texture.
- Use HB for base shading, 2B for medium, 6B for darkest areas.
- Blend each layer gently.
Fine Details
Add tiny lines for veins, hair, and wrinkles. Horses have fine features, especially around the face and legs.
- Use a sharp pencil for detail work.
- Don’t overdo details; keep them subtle.
Creating Texture
Use the side of your pencil to create rough texture for the mane and tail. For smooth skin, blend graphite carefully.
- Mix hard and soft pencils for different textures.
- Vary pencil direction for realism.
Using Negative Space
Negative space is the area around your horse. Leaving some areas blank helps the horse stand out.
- Don’t shade the background too much.
- Use white space to highlight mane and tail.
How To Draw Different Horse Breeds
Each horse breed has unique features. Drawing different breeds helps you understand variations in anatomy and style.
Comparing Horse Breeds
Here’s a comparison of three popular horse breeds:
| Breed | Main Features | Body Shape | Mane/Tail |
|---|---|---|---|
| Arabian | Small head, arched neck | Slim, graceful | Fine, silky |
| Clydesdale | Large hooves, feathered legs | Heavy, muscular | Thick, long |
| Quarter Horse | Strong shoulders, compact body | Stocky, powerful | Medium, wavy |
When drawing, adjust the head size, neck length, and body shape based on the breed.
Drawing Horses In Different Poses
Horses can stand, walk, trot, or gallop. Drawing different poses makes your artwork more interesting.
Standing Pose
A standing horse is calm, with legs straight and neck relaxed. Sketch the body upright, legs evenly spaced, and mane hanging down.
- Add shading under the belly and legs.
- Highlight muscles along the shoulders.
Walking Pose
A walking horse has one leg forward, head slightly lowered. Draw the body leaning forward, legs in motion, tail swinging.
- Use curved lines for movement.
- Shade areas where muscles stretch.
Galloping Pose
Galloping horses have stretched legs, arched back, raised tail. Sketch the body low to the ground, legs extended, mane flying.
- Add deep shading for speed.
- Highlight muscles and joints.
Jumping Pose
A jumping horse has bent legs, stretched neck, arched back. Draw the body in mid-air, legs tucked, tail lifted.
- Use strong lines for energy.
- Shade under the body for depth.

Credit: cecilieo.com
Using Reference Photos And Live Observation
Reference photos are essential for accuracy. Live observation is even better if you can visit a stable or watch horses in motion.
- Take photos from different angles.
- Study videos of horses running or jumping.
- Observe muscle movement and light direction.
Where To Find Good References
- Horse magazines
- Animal anatomy books
- Online galleries like Wikimedia Commons
Avoid copying cartoon horses; focus on real-life images for better results.
Improving Your Horse Drawing Skills
Drawing horses takes practice. Use these methods to improve:
- Daily sketching: Draw horses every day, even simple poses.
- Study anatomy: Learn about muscles, bones, and movement.
- Take art classes: Join workshops focused on animal drawing.
- Share your work: Get feedback from artists and online communities.
- Review progress: Compare old and new drawings to see improvement.
Tracking Your Progress
Keep a sketchbook and write notes about each drawing. Record what worked and what didn’t. Over time, you’ll see patterns and know where to focus.
How To Fix Mistakes In Horse Drawings
Mistakes happen, even for experienced artists. Here’s how to fix common errors:
- Proportion errors: Use an eraser to adjust shapes. Redraw lines lightly.
- Shading too dark: Lighten with a kneaded eraser. Add soft shading over mistakes.
- Wrong pose: Sketch new lines and correct leg positions.
- Flat muscles: Add curved lines and shading to show depth.
Don’t be afraid to start over if needed. Each mistake teaches you something new.
Adding Backgrounds And Environment
Backgrounds make your horse drawing more interesting. Simple grass, fences, or trees add context.
- Keep backgrounds light and less detailed.
- Use soft pencil for distant objects.
- Don’t let background overpower the horse.
If you draw a horse in a field, add grass under the hooves, a fence behind, and trees in the distance. Shade lightly so the horse stays the focus.
Credit: barnettgallery.com
Making Your Drawing Stand Out
To make your horse drawing unique, add personal touches:
- Use creative poses or expressions.
- Draw horses with accessories (saddles, bridles, blankets).
- Try different shading styles (cross-hatching, stippling).
- Experiment with colored pencils for highlights.
Real Example: Creating A Horse Portrait
For a horse portrait, focus on the head and neck. Add deep shading around the eyes, highlight the mane, and capture the horse’s personality. Use reference photos for accuracy.
Saving And Displaying Your Horse Drawings
Once your drawing is finished, protect and display it:
- Store sketches in a portfolio to avoid damage.
- Frame finished drawings with glass cover.
- Scan and share online for feedback.
If you want to sell your art, create high-quality scans and share on art websites.
Frequently Asked Questions
How Do I Draw A Realistic Horse With Pencil?
Start with basic shapes, define proportions, add major features, and refine the outline. Use shading to show muscles and depth. Study horse anatomy and practice regularly.
What Pencil Grades Should I Use For Horse Drawing?
Use 2H for light sketching, HB for outlines, 2B for shading, and 6B for deep shadows. Mixing grades helps create realistic textures and depth.
How Can I Make My Horse Drawing More Lifelike?
Focus on correct proportions, detailed eyes, and layered shading. Use reference photos, add highlights, and capture unique features like mane and tail movement.
What Are The Most Common Mistakes When Drawing Horses?
Beginners often make the head too large, legs too short, and shading too flat. Study anatomy, use measuring techniques, and avoid overusing the eraser.
Where Can I Find Good Reference Photos For Horse Drawing?
Try animal anatomy books, horse magazines, and online galleries such as Wikimedia Commons for high-quality images.
Drawing horses step by step with pencil is a journey of observation and skill. With careful practice, you’ll capture the power and grace of these beautiful animals. Remember, each drawing is a chance to learn and improve. Stay patient, keep experimenting, and enjoy the art of horse drawing.